Typefully

Write better content
Grow your audience faster

Built for 𝕏 and LinkedIn, powered by AI

Write & schedule, effortlessly

Craft and publish engaging content in an app built for creators.

NEW
Avatar
Avatar

Add LinkedIn version

Cross-post to LinkedIn

Automatically add LinkedIn versions to your posts.

Make it punchier 👊
Avatar

Typefully

@typefully

We're launching a Command Bar today with great commands and features.

AI ideas and rewrites

Get suggestions, tweet ideas, and rewrites powered by AI.

Turn your tweets & threads into a social blog

Give your content new life with our beautiful, sharable pages. Make it go viral on other platforms too.

+14

Followers

Powerful analytics to grow faster

Easily track your engagement analytics to improve your content and grow faster.

Build in public

Share a recent learning with your followers.

Create engagement

Pose a thought-provoking question.

Never run out of ideas

Get prompts and ideas whenever you write - with examples of popular tweets.

@aaditsh

@aaditsh

I think this thread hook could be improved.

@frankdilo

@frankdilo

On it 🔥

Share on drafts & leave comments

Write with your teammates and get feedback with comments.

NEW
Avatar

Easlo

@heyeaslo

Reply with "Notion" to get early access to my new template.

Avatar

Jaga

@kandros5591

Notion 🙏

DM Sent

Create giveaways with Auto-DMs

Send DMs automatically based on engagement with your tweets.

And much more:

Auto-Split Text in Posts

Thread Finisher

Tweet Numbering

Pin Drafts

Connect Multiple Accounts

Automatic Backups

Dark Mode

Keyboard Shortcuts

Creators love Typefully

120,000+ creators and teams chose Typefully to curate their Twitter presence.

Avatar
DHH@dhh
This is my new go-to writing environment for Twitter threads. They've built something wonderfully simple and distraction free with Typefully 😍
Avatar
Marc Köhlbrugge@marckohlbrugge
Tweeting more with @typefully these days. 🙈 Distraction-free ✍️ Write-only Twitter 🧵 Effortless threads 📈 Actionable metrics I recommend giving it a shot.
Avatar
Santiago@svpino
For 24 months, I tried almost a dozen Twitter scheduling tools. Then I found @typefully, and I've been using it for seven months straight. When it comes down to the experience of scheduling and long-form content writing, Typefully is in a league of its own.
Avatar
Luca Rossi ꩜@lucaronin
After trying literally all the major Twitter scheduling tools, I settled with @typefully. Killer feature to me is the native image editor — unique and super useful 🙏

Queue your content in seconds

Write, schedule and boost your tweets - with no need for extra apps.

Schedule with one click

Queue your post with a single click - or pick a time manually.

Pick the perfect time

Time each post to perfection with Typefully's performance analytics.

Boost your content

Retweet and plug your posts for automated engagement.

Queue

Start creating a content queue.

Write once, publish everywhere

We natively support multiple platforms, so that you can expand your reach easily.

Twitter
LinkedIn

Check the analytics that matter

Build your audience with insights that make sense.

Posts

Writing prompts & personalized post ideas

Break through writer's block with great ideas and suggestions.

Never run out of ideas

Enjoy daily prompts and ideas to inspire your writing.

Use AI for personalized suggestions

Get inspiration from ideas based on your own past tweets.

Flick through topics

Or skim through curated collections of trending tweets for each topic.

Prompts

Write, edit, and track tweets together

Write and publish with your teammates and friends.

@frankdilo
@kandros5591

Share your drafts

Brainstorm and bounce ideas with your teammates.

NEW
@aaditsh

@aaditsh

I think this thread hook could be improved.

@frankdilo

@frankdilo

On it 🔥

Add comments

Get feedback from coworkers before you hit publish.

Read, Write, Publish

Read, WriteRead

Control user access

Decide who can view, edit, or publish your drafts.

Build an automated post machine

Our Zapier integration enables countless no-code workflows.

TypefullySlack

Share new drafts in Slack channel

RSSTypefully

New draft from RSS feed item content

DocsTypefully

New scheduled draft from Google Doc

TypefullySheets

New spreadsheet row from published post

ScheduleTypefully

Create new template draft every Monday

TypefullyGmail

Send an email for every published thread

FeedlyTypefully

Create draft for new items in feeds folder

TwitterTypefully

Thank new followers with a post

Ready to write better content and grow your audience?

Get started with our generous free plan.

Typefully

© 2022 Mailbrew Inc.

Privacy

Terms

Contact us

Work with us

Product

Pricing

Changelog

Keyboard shortcuts

Invite teammates

Affiliate program

Grow on 𝕏

Typefully Academy

Get a social blog

Automate with Zapier

Boost engagement

Popular profiles

Twitter Card Validator

X Card Validator

Help & Social

Help pages

Brand assets

Twitter

Blog

Announcements

Typefully

Typefully

Blending Modes

Avatar

Share

 • 

A year ago

 • 

View on X

Do you just click different blending modes until it sort of looks right? Well, that probably won't change after you read this but at least you probably won't use Lighten or Darken again. (you should bookmark this thread and use it as a reference)
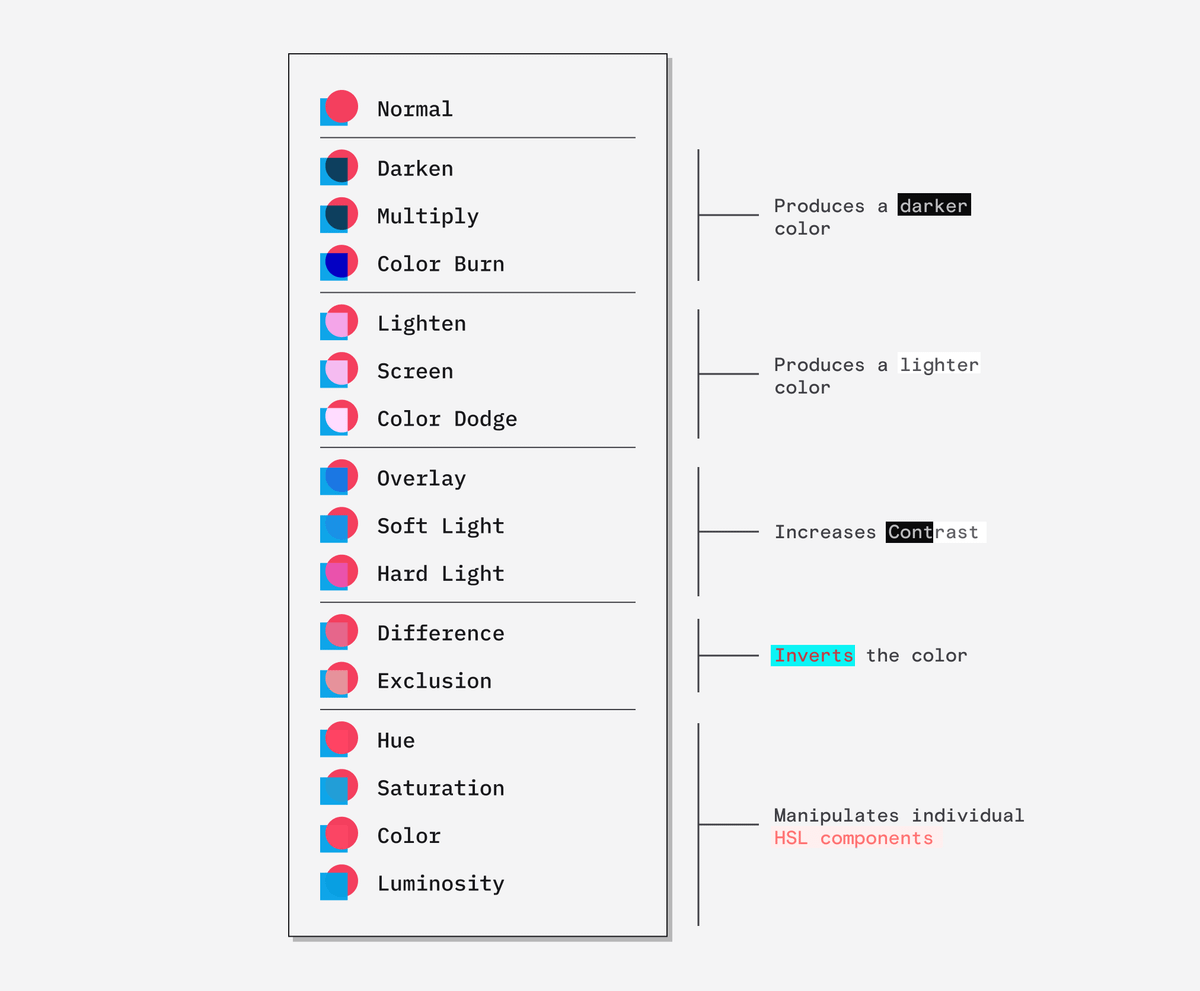
Put simply, blending modes are a way of creating a new colour based on two input colours. Hierarchy matters to the way we work out the new colour so the input colours are split into background and foreground.
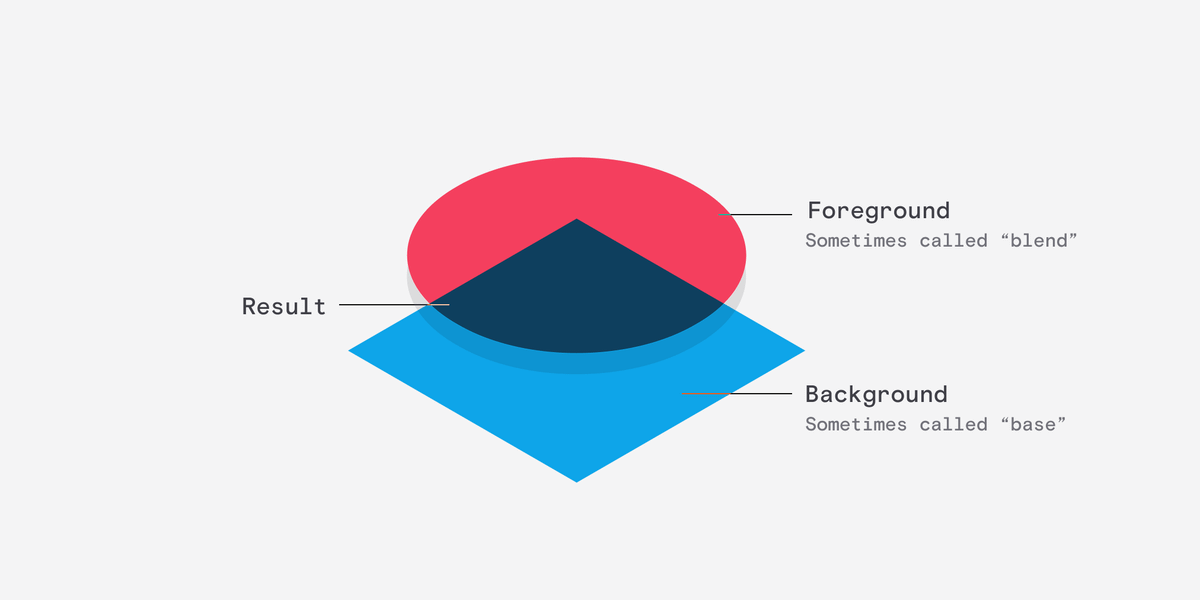
Let's start with Darken and Lighten These are the simplest blending modes and the produce a fairly predictable darkening or lightening.
Darken compares each colour's RGB value and selects the darkest value - creating a new colour.
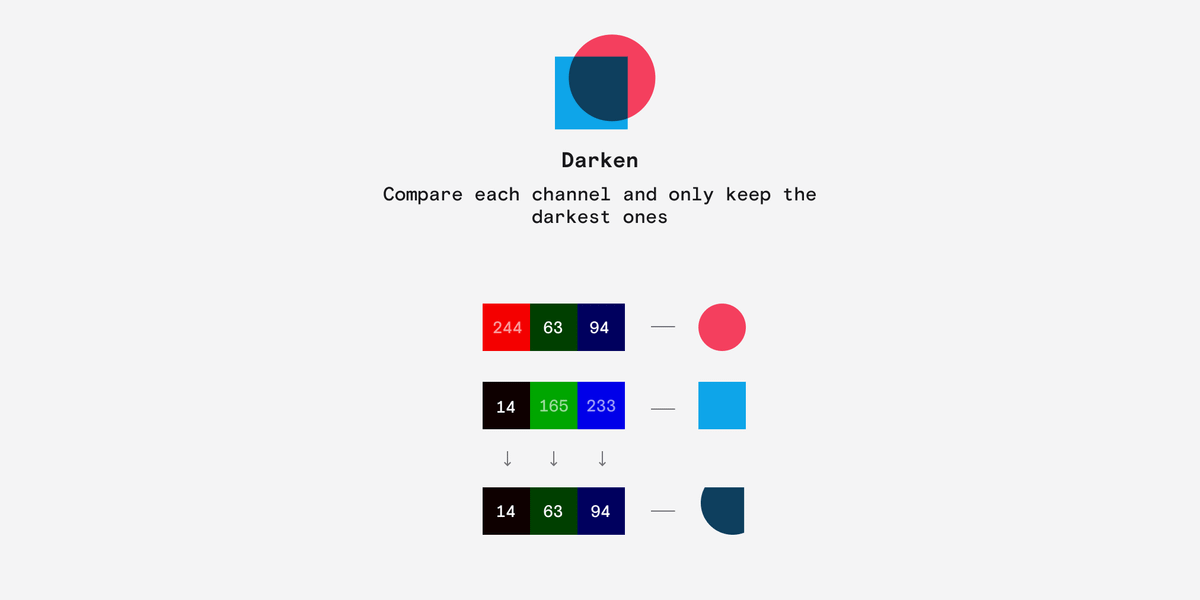
Lighten does exactly the same thing but it selects the lightest value.
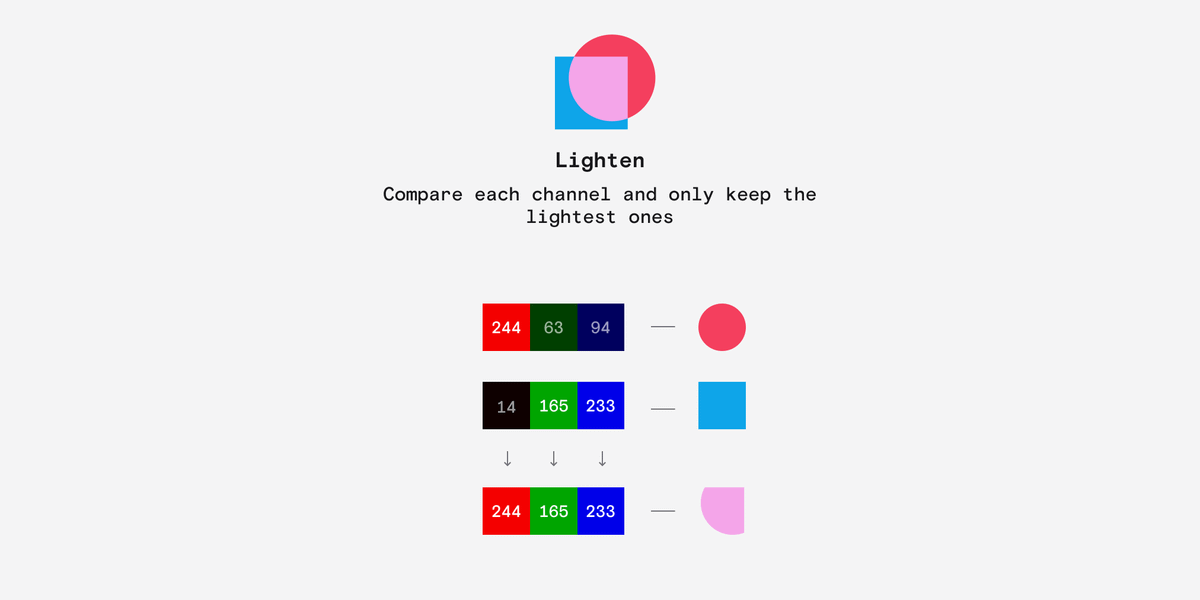
Next up are Multiply and Screen. Although they produce similar results, you can think of these as more elegant versions of Darken and Lighten that result in a bit more contrast. When you have Screen and Multiply, there is no good reason to use Lighten or Darken.
Multiply does exactly what you'd think, it simply multiplies each channel together. Because the values are normalised between 0 and 1 the product is always darker than the original.
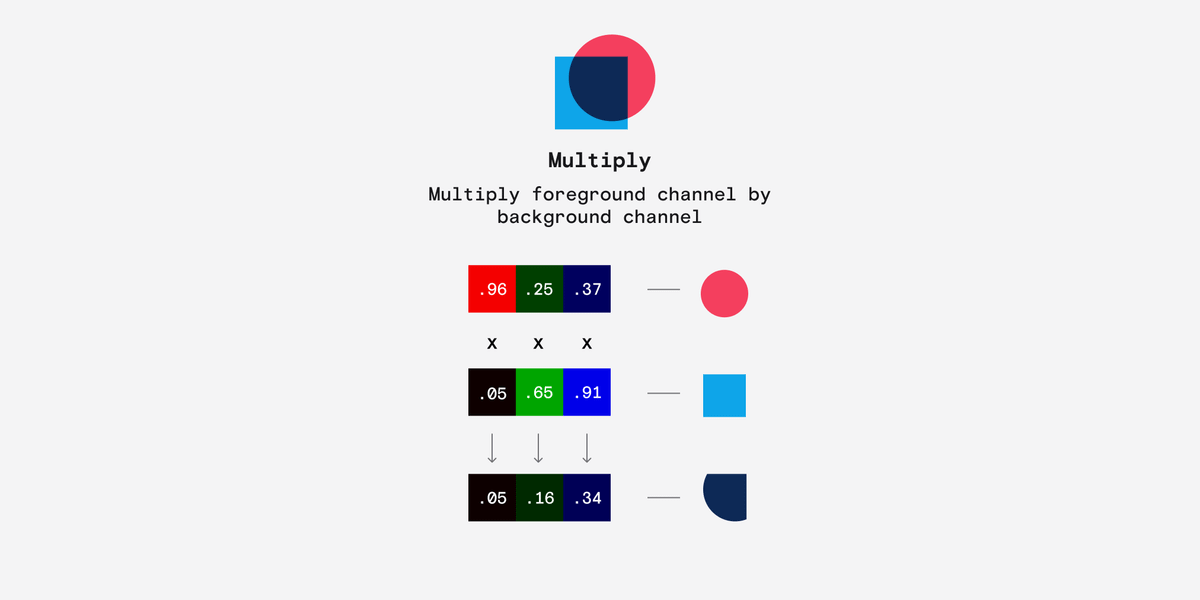
Screen is actually similar to Multiply but it inverts both the inputs and the result, which is why the result is always lighter. Again, we need to normalise the values between 0 and 1 to work this out.
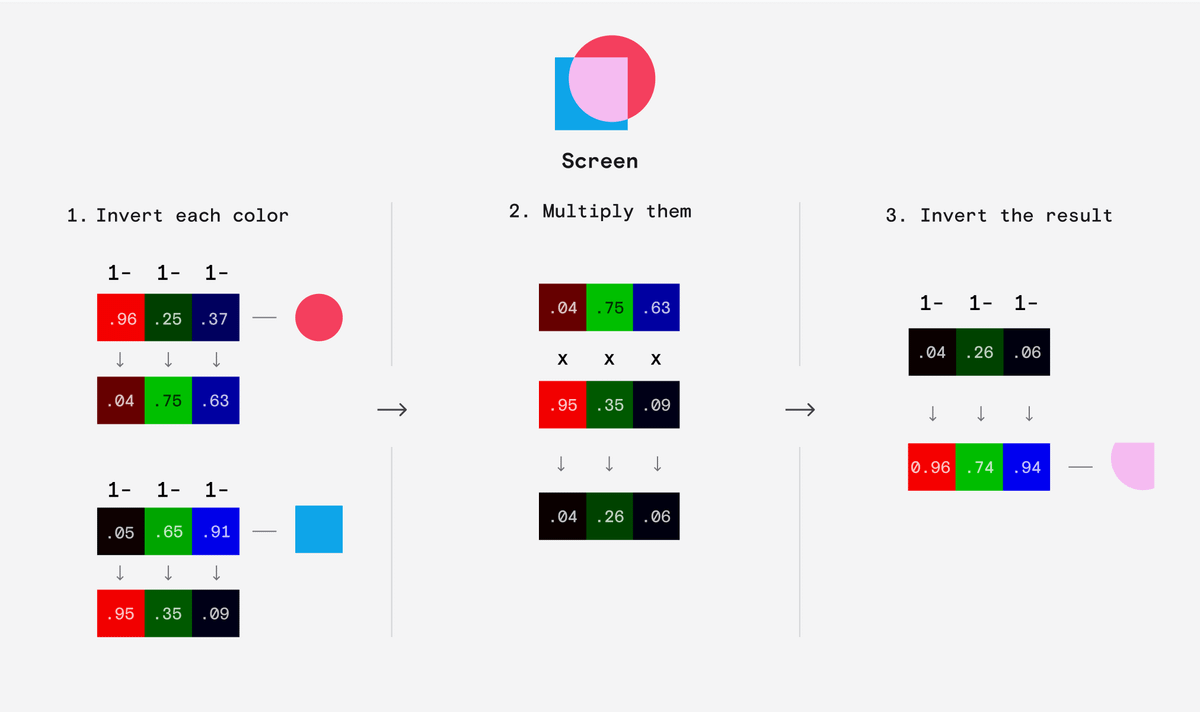
The last pair of darkening/lightening modes are Color Burn and Color Dodge. They have a pronounced step so they can produce quite harsh results compared to the previous modes.
Color Burn works by inverting the background, dividing it by the foreground and inverting the result.
Color Dodge is similar but we invert the foreground divide the background by it.
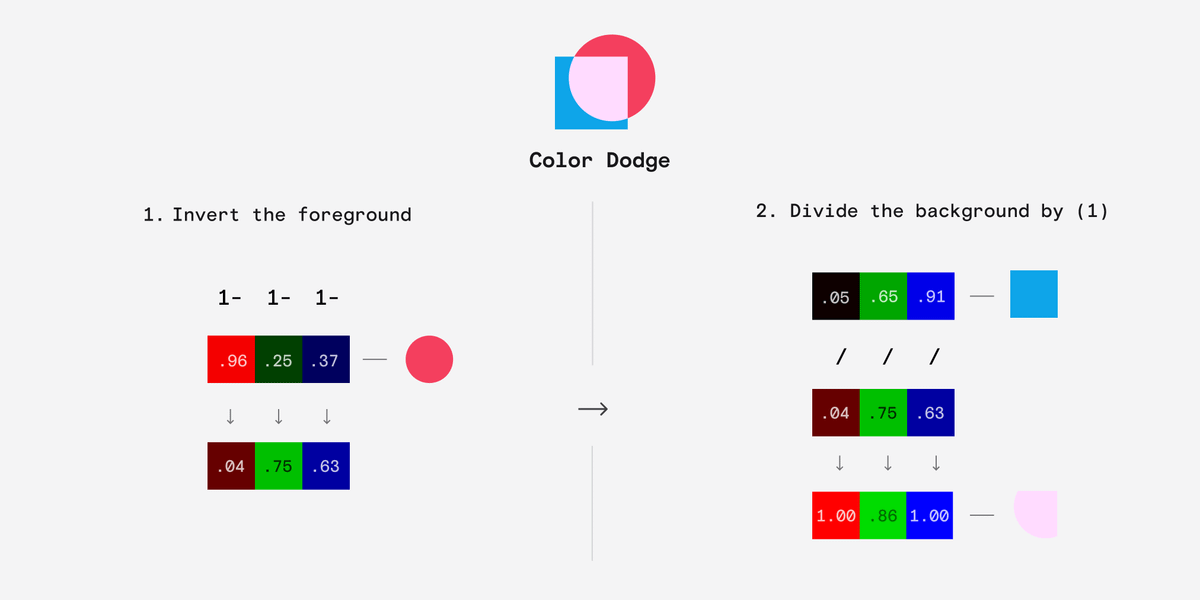
Overlay, Soft Light and Hard Light are known as contrast blending modes because they make the lights lighter and the darks darker. These are the most versatile blending mode, especially for images.
Overlay is interesting. If the background value is light (> 127.5 ) then it applies Screen at half strength making the foreground lighter. If the background value is dark it applies Multiply at half strength making the foreground darker.
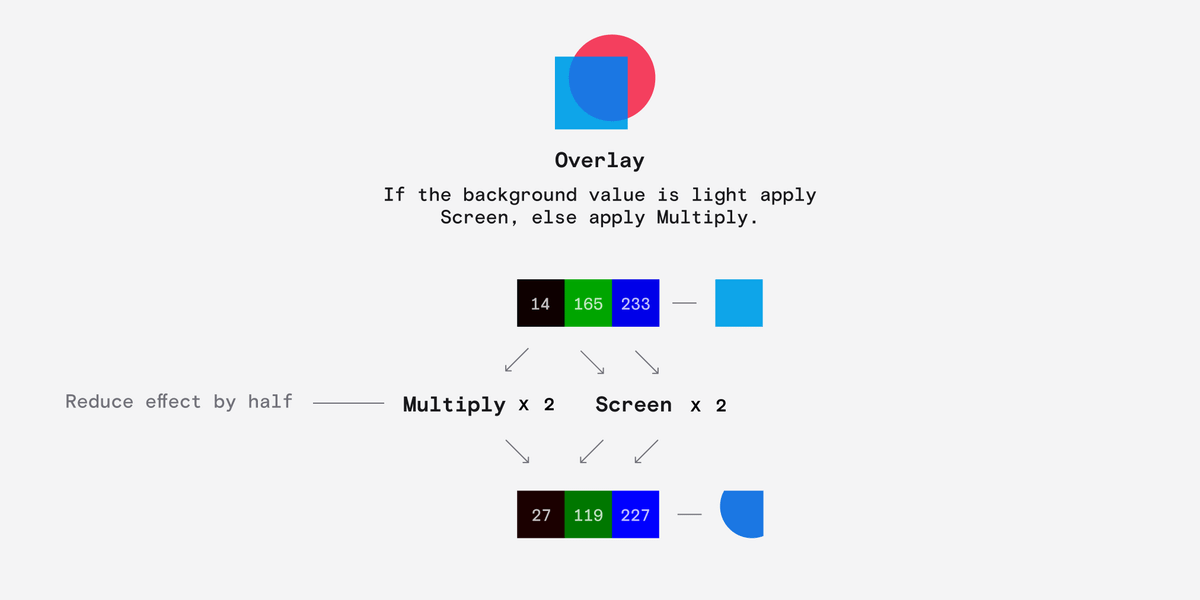
Hard Light is exactly the same as Overlay except it uses the foreground layer. If the foreground is > 127.5 then apply Screen at half strength, else apply Multiply at half strength.
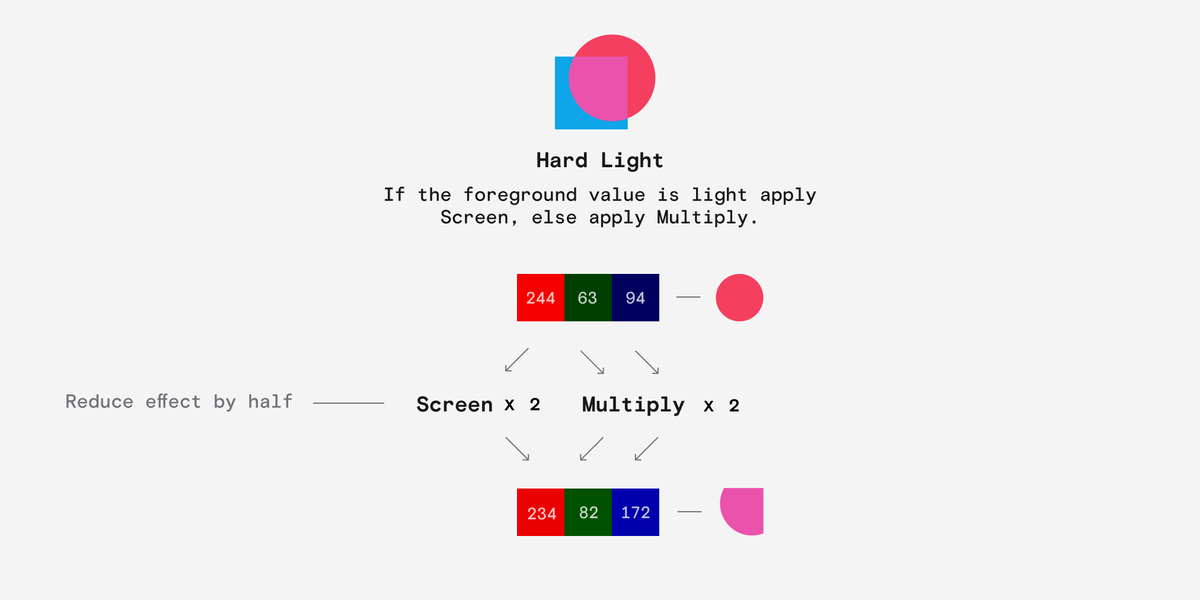
Soft Light is the most complicated of the standard blending modes. It produces similar results to Overlay but is more subtle. Multiply the inverted foreground by the squared background and add it to two times the product of the foreground and background. Simple.
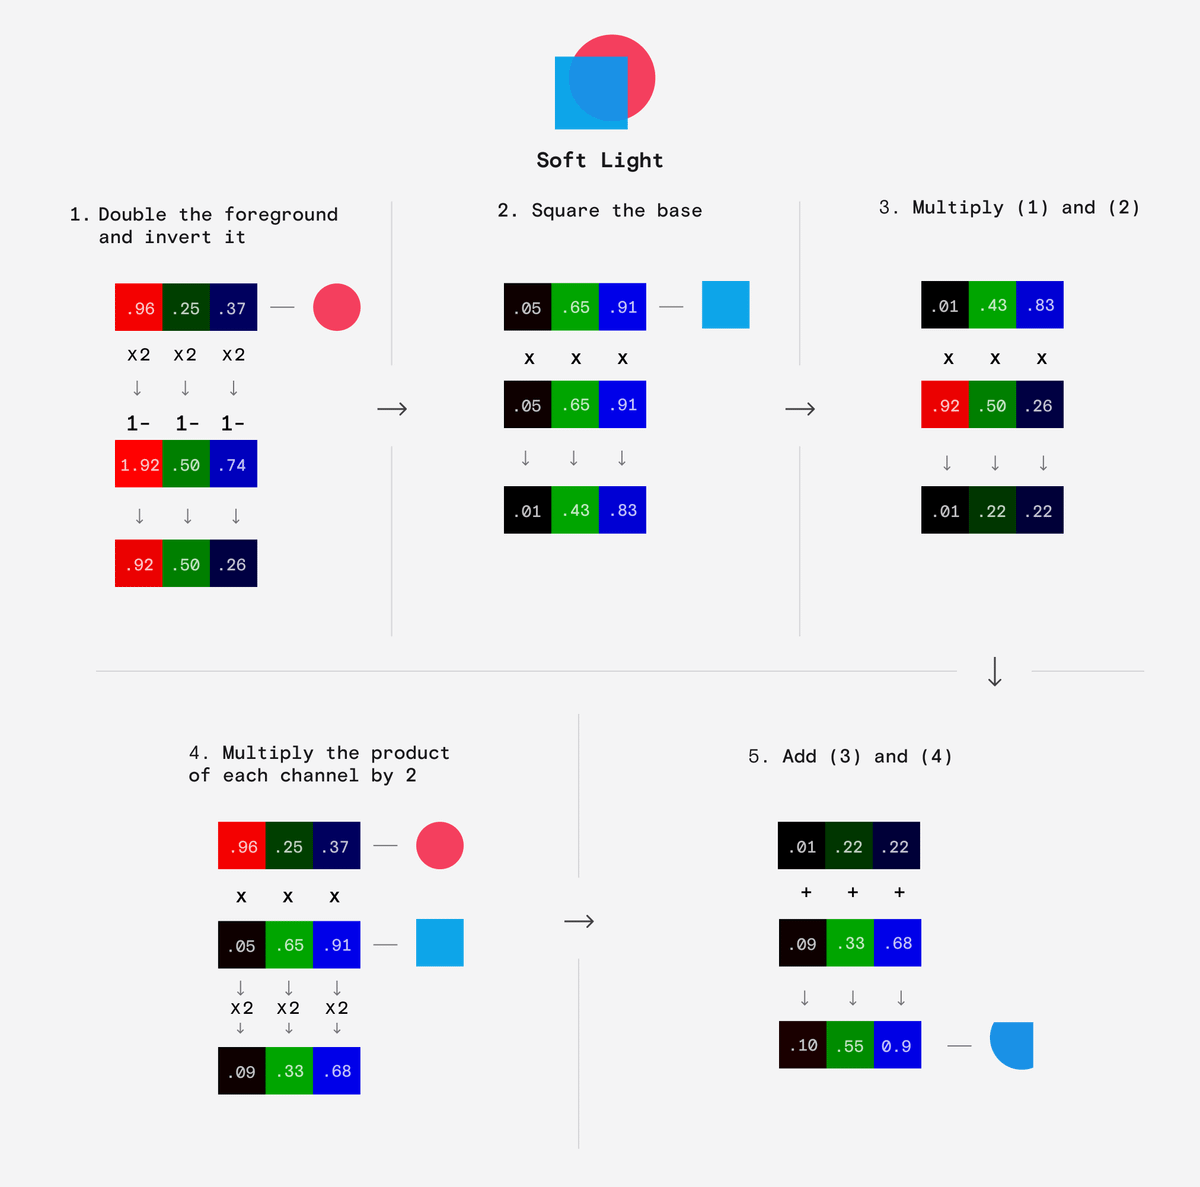
Difference and Exclusion are known as inversion blending modes as they create a color that's almost the opposite of one of the inputs.
Difference does exactly what it sounds like - finds a color inbetween the input colors. Subtract the bottom colour from the top colour. Any negative numbers are made positive.
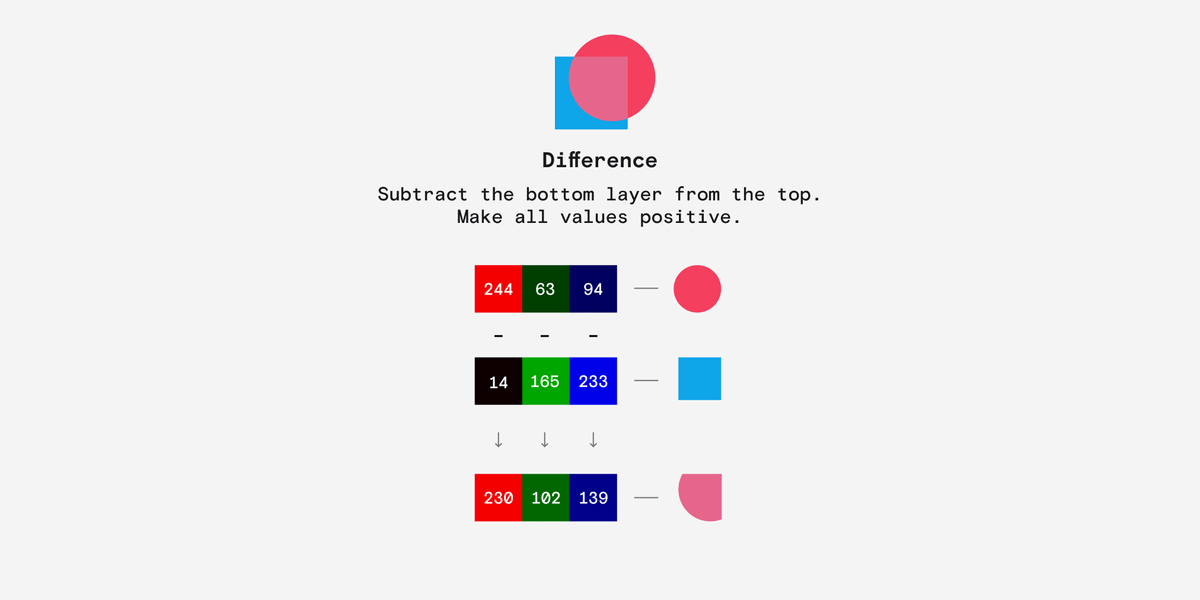
Exclusion produces a similar result but in a much more complicated way. Subtract double the product of each channel from the sum of each channel. To do this, we need to normalise the values between 0 and 1.
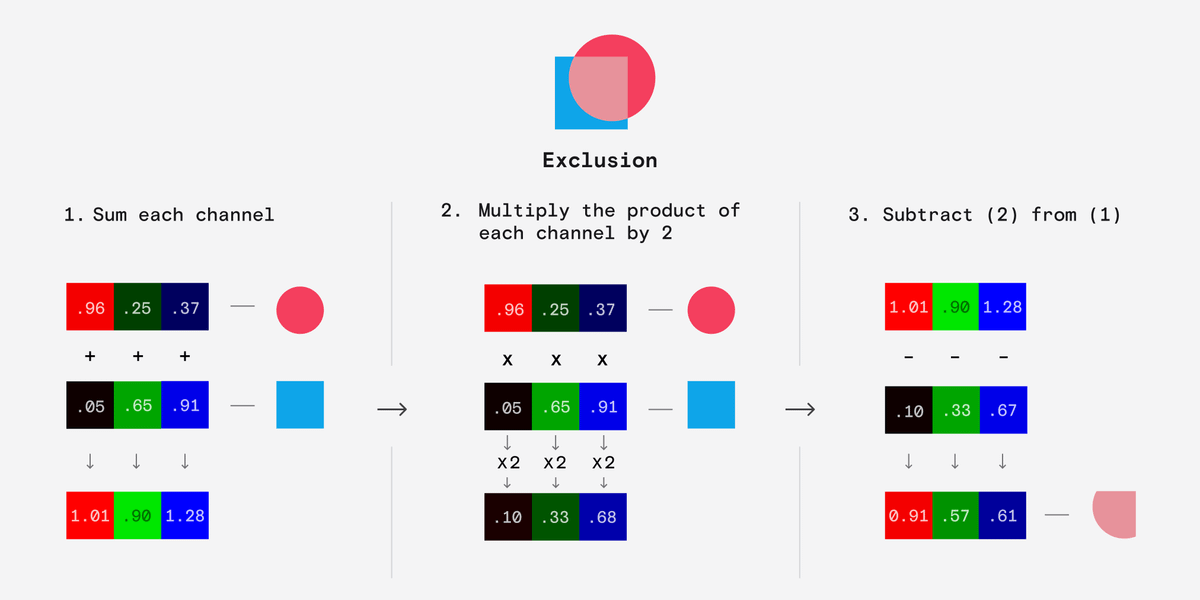
Hue, Saturation, Color and Luminosity are different from the other modes because they manipulate the Hue, Saturation and Luminosity components rather than the RGB values. They derive a new color by combining the HSL values of the two inputs.
Hue takes the Hue value from the foreground and the Saturation and Luminosity values from the background.
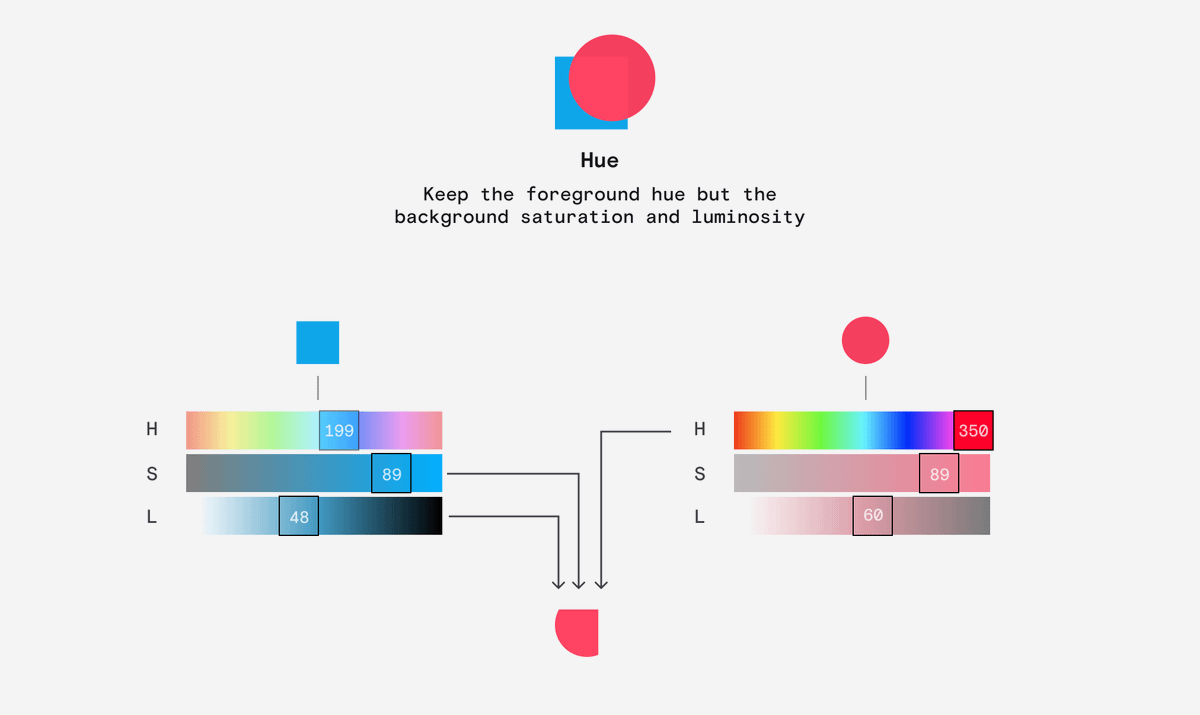
Saturation takes the Saturation value from the foreground and the Hue and Luminosity values from the background.
Color takes the Saturation and Hue values from the foreground and the Luminosity values from the background.
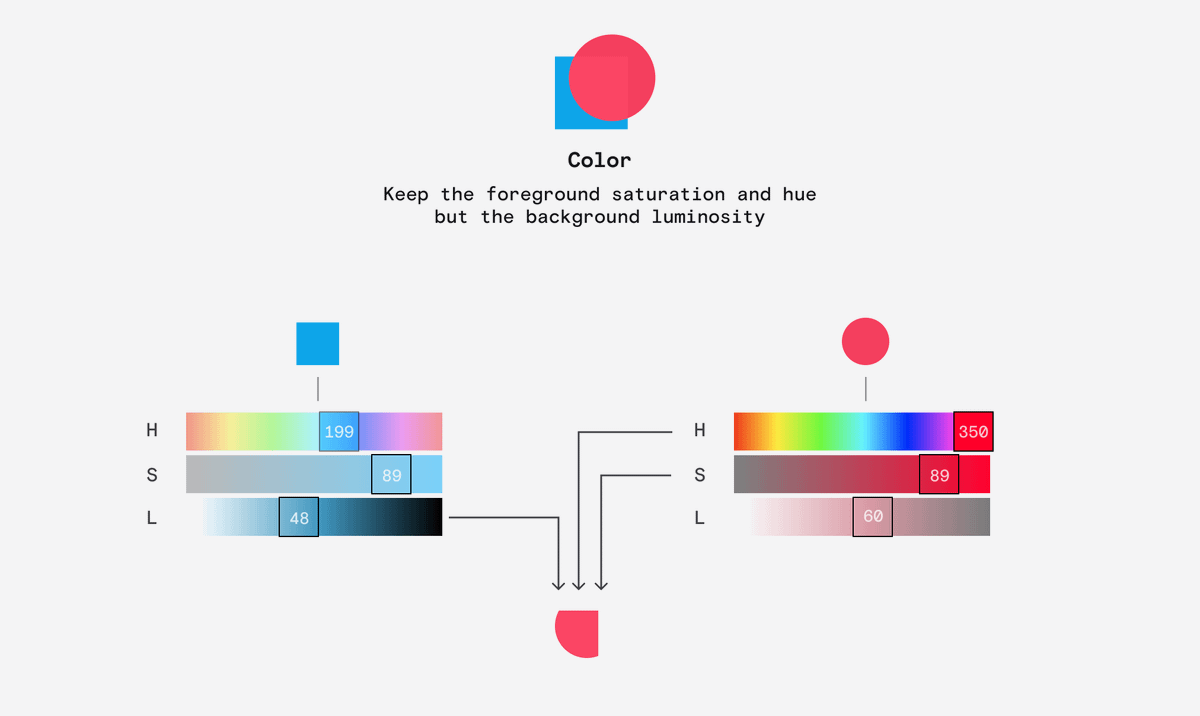
Lastly, Luminosity takes the Luminosity value from the foreground and the Hue and Saturation values from the background.
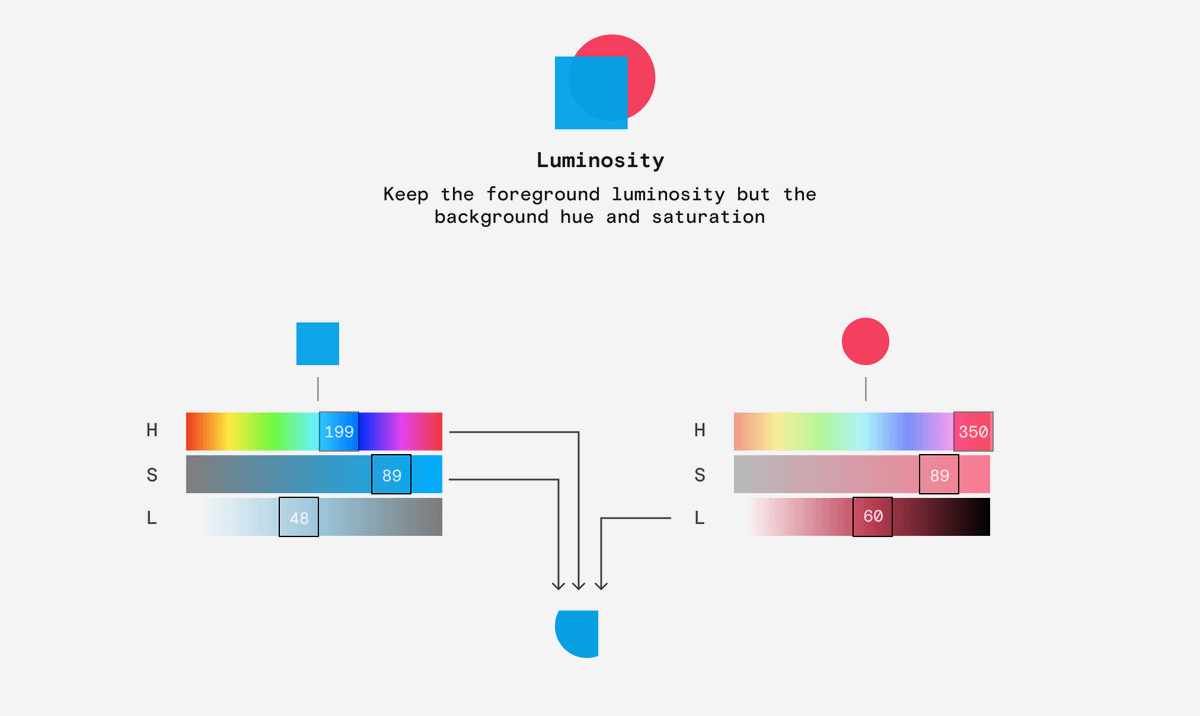
Avatar

Dan Hollick

@DanHollick

design @raycastapp - tweets about design systems and tools. Framer course: advancedframer.com